Table of Contents
ToggleA wood accent wall delivers instant visual impact, it anchors a room, adds texture, and brings warmth that paint alone can’t match. Whether you’re working with reclaimed barn wood, sleek slats, or budget-friendly plywood, a well-executed accent wall transforms a bland space into something memorable. Unlike full room paneling, a single accent wall keeps material costs manageable and installation within reach of most DIYers. This guide walks through popular styles, installation steps, material selection, and cost-effective alternatives to help you plan and execute a wood accent wall that fits your skill level and budget.
Key Takeaways
- A wood accent wall adds instant visual impact and warmth while keeping material costs manageable compared to full room paneling, making it an accessible DIY project for most homeowners.
- Wood accent wall styles range from rustic reclaimed wood ($4–$12 per sq ft) to modern slatted or geometric designs, each offering unique aesthetic value and requiring different skill levels for installation.
- Proper wood acclimation for 48–72 hours before installation, precise stud location marking, and consistent leveling of the first board are critical to preventing gaps, buckling, and installation mistakes.
- Wood species selection should consider durability and room use—pine suits budget builds, oak offers richer grain for durability, and cedar or redwood are ideal for moisture-prone areas like bathrooms.
- Budget-friendly alternatives like peel-and-stick veneer ($1–$3 per sq ft), plywood panel methods, or grade mixing allow you to achieve wood accent wall aesthetics without premium material costs.
- Wood accent walls solve design problems by hiding imperfect drywall, creating focal points in open spaces, and adding acoustic dampening—plus they age well and develop character over time with proper sealing.
Why Wood Accent Walls Are a Timeless Design Choice
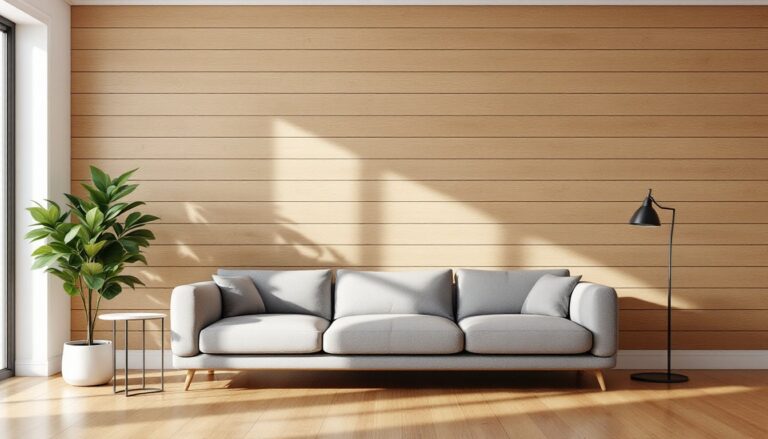
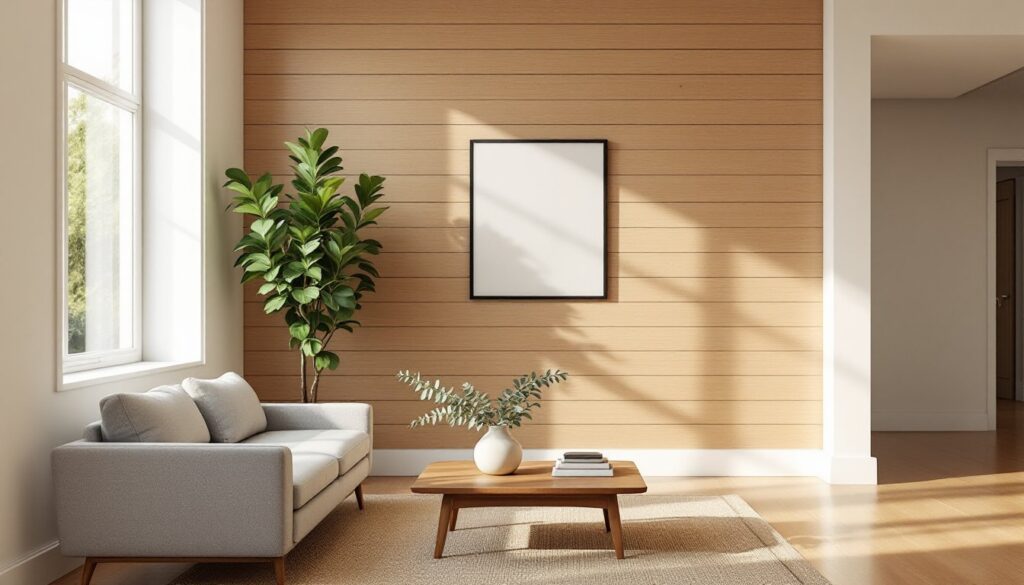
Wood accent walls have staying power because they bridge the gap between rustic and modern aesthetics. A vertical shiplap wall reads farmhouse: horizontal slats with spacing look mid-century. The material itself, whether pine, oak, or reclaimed Douglas fir, carries natural grain variation that makes each installation unique.
From a practical standpoint, wood accent walls solve common design problems. They hide imperfect drywall, create a focal point in open-concept spaces, and add acoustic dampening in rooms with hard surfaces. Unlike tile or stone, wood is forgiving to work with: you can nail, screw, or adhesive-mount it, and mistakes are easier to correct.
Wood also ages well. A properly sealed accent wall develops character over time rather than looking dated. In bedrooms, the texture adds coziness: in living rooms, it provides a backdrop for furniture and art. The tactile quality, something you don’t get with wallpaper or paint, makes the space feel intentional and layered.
One consideration: fire ratings. While wood accent walls are allowed in most residential applications, some jurisdictions require fire-rated materials in attached garages or near fireplaces. Check local building codes, particularly if you’re installing near a heat source or in a multi-family dwelling.
Popular Wood Accent Wall Styles and Designs
Reclaimed and Rustic Wood Patterns
Reclaimed wood, salvaged from barns, factories, or old fencing, delivers instant character with weathered patinas, nail holes, and color variation you can’t replicate with new lumber. Expect to pay $4–$12 per square foot for reclaimed material, depending on species and finish. Barnwood typically runs on the higher end: pallet wood (if you source it yourself) can be nearly free but requires extensive cleaning, denailing, and planing.
Installation usually involves random-width horizontal planks, which hides seams and plays up the salvaged aesthetic. Because reclaimed wood often has inconsistent thicknesses, you’ll need to shim or sand boards flush as you go. Surface prep matters here: clean off dirt and loose splinters, but leave the patina intact, that’s the whole point.
For a shiplap look with reclaimed feel, consider a shiplap fireplace accent wall installation using budget-friendly pine or cedar boards. Shiplap’s rabbet joint creates tight seams and a clean shadow line. You can install it over drywall with a pneumatic brad nailer (18-gauge, 2-inch brads work well) directly into studs, or use construction adhesive as a supplement.
Safety note: Reclaimed wood may contain lead paint, creosote, or embedded metal. Wear a dust mask rated N95 or higher when cutting, and inspect boards carefully before running them through a planer or table saw.
Modern Geometric and Slatted Designs
Slatted accent walls, horizontal boards spaced evenly with gaps, create depth and shadow play. They’re popular in 2026 for their clean, Scandinavian-inspired look. Typical spacing runs 1 to 3 inches between slats, mounted on vertical furring strips or a plywood backer.
For a slatted wall, rip 1×2 or 1×3 furring strips (actual dimensions: 3/4″ x 1.5″ or 3/4″ x 2.5″) from common pine or poplar. Mount the slats with 1 1/4-inch finish nails into studs, using a spacer block cut to your desired gap width to keep spacing consistent. Paint or stain the slats before installation to avoid tedious cut-in work afterward.
Geometric patterns, chevron, herringbone, or grid layouts, add visual interest but demand precision. Miter cuts at 45 degrees are common: a miter saw is essential here, as a circular saw won’t deliver the accuracy needed for tight seams. Dry-fit the pattern on the floor first to work out your layout and minimize waste.
These modern designs often use lighter wood tones or painted finishes. White oak, maple, or birch plywood (with edge banding) keeps the look airy. For painted finishes, use a bonding primer like Sherwin-Williams Extreme Bond before topcoating, it adheres to wood without heavy sanding and prevents tannin bleed-through.
Step-by-Step Guide to Installing a Wood Accent Wall
Materials List:
- Wood planks or slats (calculate square footage + 10% waste)
- Furring strips or plywood backer (if not nailing directly to studs)
- Construction adhesive (PL Premium or equivalent)
- Finish nails or brad nails (18-gauge, 1.5–2 inches)
- Wood filler, sandpaper (120- and 220-grit)
- Primer and finish (stain, poly, or paint)
Tool List:
- Stud finder
- Level (4-foot or laser)
- Miter saw or circular saw with guide
- Pneumatic nailer or hammer and nail set
- Tape measure, pencil, chalk line
- Safety glasses, hearing protection, dust mask
Step-by-Step Process:
-
Prep the wall. Remove outlet covers, patch holes, and clean the surface. You don’t need to sand drywall smooth, but remove any loose paint or texture. If the wall has significant bow or waves, consider installing 1×2 furring strips horizontally at 16-inch intervals to create a flat plane.
-
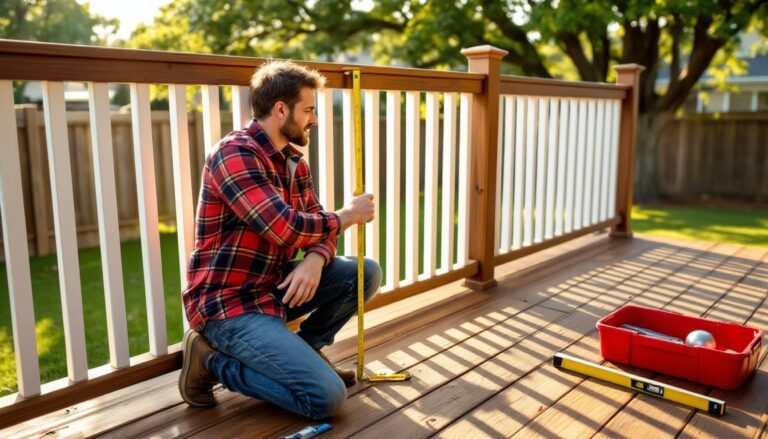
Locate and mark studs. Use a stud finder to mark centerlines with a pencil. Studs are typically 16 inches on center in modern framing. Mark lightly at the top and bottom of the wall, then snap a chalk line if you’re installing vertical planks.
-
Acclimate the wood. Let boards sit in the room for 48–72 hours before installation. Wood expands and contracts with humidity changes: acclimation reduces gaps and buckling after install.
-
Start at the bottom (for horizontal installs) or at a corner (for vertical). Use a level to ensure your first board is plumb or level, every subsequent board references this one. Nail into studs with two nails per stud location, angling slightly to increase holding power.
-
Work your way across or up. If you’re using tongue-and-groove boards, tap them together with a scrap block and hammer to avoid damaging edges. For shiplap or straight-edge boards, maintain consistent spacing with a nickel or cardboard shim if you want a small reveal.
-
Cut around outlets and obstacles. Measure twice, cut once. A jigsaw handles cutouts for outlets and switches: remember to account for the faceplate overlap. Turn off power at the breaker before working near electrical boxes.
-
Fill nail holes and sand. Use wood filler that matches your finish (natural filler for stain, paintable filler for painted walls). Let dry, then sand flush with 220-grit paper.
-
Apply finish. Pre-finishing boards before install saves time, but touch-ups are still needed at seams and nail holes. For natural wood, apply two coats of polyurethane (water-based dries faster and has less odor). For painted walls, prime first, then apply two coats of your topcoat.
Permits and Codes: Most accent walls are cosmetic and don’t require permits, but if you’re removing drywall or altering a load-bearing wall, consult a structural engineer and pull the necessary permits. Adding weight to a wall (especially with thick hardwood or stone veneer) may also require additional fastening or backer board.
Choosing the Right Wood and Finish for Your Space
Species and Grade:
Pine is the go-to for budget builds, $1.50–$3 per board foot, easy to cut, and widely available. It dents easily, so avoid it in high-traffic areas like mudrooms. Poplar is similarly affordable and takes paint well, but its greenish grain shows through stain.
For durability and richer grain, step up to red oak or white oak ($4–$8 per board foot). Oak’s open grain adds texture, and it holds up to wear. Walnut and cherry are premium choices ($8–$15 per board foot), offering deep tones and fine grain, but they’re overkill for a painted accent wall.
Plywood is an underrated option, 3/4-inch birch or maple plywood runs about $50–$70 per 4×8 sheet and yields a clean, modern look when edge-banded. Cut it into strips with a table saw or circular saw and guide, then mount horizontally or vertically.
Moisture Considerations:
Bathrooms and basements need moisture-resistant finishes. Cedar and redwood naturally resist rot and are good choices for humid spaces. Seal all wood in bathrooms with a marine-grade spar urethane or exterior-rated polyurethane, these flex with humidity changes and block water penetration.
In basements, ensure the wall is fully dry before installing wood. If the concrete foundation sweats or has efflorescence (white mineral deposits), address the moisture issue first with a vapor barrier and proper drainage.
Finish Options:
- Natural/Clear Finish: Highlights wood grain. Use water-based poly for a clear, non-yellowing finish, or oil-based for amber warmth. Apply with a foam brush or HVLP sprayer for even coverage.
- Stain: Test on scrap wood first, stain color varies widely by species. Gel stains offer more control and hide blotchiness on soft woods like pine.
- Paint: Use a bonding primer and two coats of interior latex or acrylic paint. Lighter colors make small rooms feel larger: dark tones add drama but show dust more readily.
- Whitewash or Lime Wash: Dilute white paint with water (1:1 ratio) for a translucent, textured finish that lets grain show through. Popular for coastal or farmhouse aesthetics.
For design inspiration and color pairing ideas, resources like House Beautiful showcase current trends in wood finishes and room styling.
Budget-Friendly Alternatives and DIY Tips
Peel-and-Stick Veneer:
If real wood is out of budget or you’re renting, peel-and-stick wood veneer planks ($1–$3 per square foot) mimic the look without permanent installation. Quality varies, cheaper options peel at seams: mid-tier products from brands like Stikwood hold up well. They apply directly to drywall, and removal is easier than nailed planks, though some paint damage is possible.
Plywood Panel Method:
Instead of individual boards, panel an entire wall with 1/4-inch plywood ($25–$35 per sheet), then add 1×2 battens in a grid or vertical pattern for a board-and-batten look. This method is faster than plank-by-plank install and uses less material. Paint the plywood and battens before install, touch up seams after.
Pallet Wood Projects:
Free or cheap pallet wood is tempting, but proceed carefully. Many pallets are treated with methyl bromide (marked “MB”) and aren’t safe for indoor use. Look for heat-treated pallets (marked “HT”). Even then, denailing, planing, and sanding pallet wood is labor-intensive, factor in your time.
For detailed plans on woodworking projects and techniques, Fix This Build That offers step-by-step guides that help refine your skills and avoid common mistakes.
Cost-Saving Tips:
- Buy in bulk: Lumber yards often discount orders over a certain board footage. A single accent wall (100–150 square feet) qualifies.
- Mix grades: Use clear, knot-free boards at eye level and lower grades near the floor or ceiling where defects are less visible.
- Rip your own: Buying wider boards and ripping them to width on a table saw can be cheaper than buying pre-milled trim.
- Skip exotic species: Domestic hardwoods like oak and ash deliver similar visual impact at half the cost of imported exotics.
Common DIY Mistakes to Avoid:
- Skipping acclimation: Boards installed straight from the truck will expand or contract, creating gaps or buckling.
- Not checking for plumb/level: A crooked first board compounds across the wall. Always verify with a level.
- Over-nailing: More nails don’t mean more strength, they just mean more holes to fill. Two nails per stud location is sufficient for most applications.
- Ignoring grain direction: Install boards with grain running the same direction for a cohesive look, especially with natural finishes.
If you’re new to finish carpentry, start with a small wall, a hallway or bedroom accent, before tackling a large living room installation. The learning curve is gentle, and the impact is immediate.