Table of Contents
ToggleChoosing the right standing desk legs can feel overwhelming, the market’s flooded with standing desk frames, electric height-adjustable systems, and manual options with wildly varying load capacities and price points. But here’s the thing: the legs are the foundation of your entire setup. Get them wrong, and you’ll deal with wobble, premature failure, or compatibility headaches. Get them right, and you’ve got a rock-solid workstation that’ll outlast multiple desktop swaps. Whether you’re building a custom desk from scratch or upgrading an existing surface, this guide walks through everything from frame types to installation, helping you avoid costly mistakes and build a desk that actually works for your space.
Key Takeaways
- Standing desk legs form the foundation of your workspace, and choosing quality frames prevents wobble, premature failure, and compatibility issues that plague cheaper alternatives.
- Always verify load capacity and add a 25% safety margin; budget electric frames with brushless motors outperform basic DC motors and handle 250+ pounds without strain.
- Electric frames offer superior convenience with programmable height presets for daily sit-stand switching, while manual crank systems cost $150–$250 but discourage frequent adjustments and suit secondary workstations only.
- Proper installation requires centering the frame, pre-drilling pilot holes to prevent splitting, and testing full motion before loading equipment—a critical step many DIY enthusiasts skip.
- Monthly bolt inspections, six-month lubrication with silicone-based products, and annual power supply checks extend standing desk legs lifespan to 10+ years and prevent costly repairs.
- Desktop dimensions, weight distribution, noise levels (45–60 decibels), and future-proofing capability should guide your frame selection to ensure long-term ergonomic comfort and stability.
What Are Standing Desk Legs and Why Do They Matter?
Standing desk legs, often sold as a standing desk base only or complete frame kit, are the mechanical foundation that supports the desktop and provides height adjustment. Unlike fixed-height desk legs, these systems incorporate motors, cranks, or gas springs to raise and lower the work surface, typically ranging from 24 to 50 inches.
The frame matters more than most people realize. A quality standing desk frame carries the entire load, desktop, monitors, computer, and whatever clutter accumulates, while maintaining stability through dozens of daily height changes. Cheap legs sag under weight, drift out of alignment, or suffer motor burnout within a year. Good ones last a decade or more.
Load capacity is the critical spec to check first. Most standing desk frames are rated between 150 and 350 pounds. That sounds like plenty, but once you add a solid-wood desktop (a 60-inch butcher block slab can weigh 80+ pounds), dual monitors, a docking station, and peripherals, you’re closer to the limit than you’d think. Always leave a 25% safety margin.
Stability depends on frame width, column design, and whether the base uses a two-leg or four-leg configuration. Two-leg electric standing desk frames are standard for home offices: they’re affordable and fit most desktops between 48 and 80 inches wide. Four-leg frames handle heavier loads and larger surfaces but cost significantly more and require more floor space.
The frame also determines desktop compatibility. Most standing desk legs use a crossbar or mounting bracket system with pre-drilled holes on 1-inch centers. If you’re reusing an existing desktop or building a custom one, confirm the frame’s width range and mounting pattern before you buy.
Types of Standing Desk Legs for Your Home Office
Electric Height-Adjustable Legs
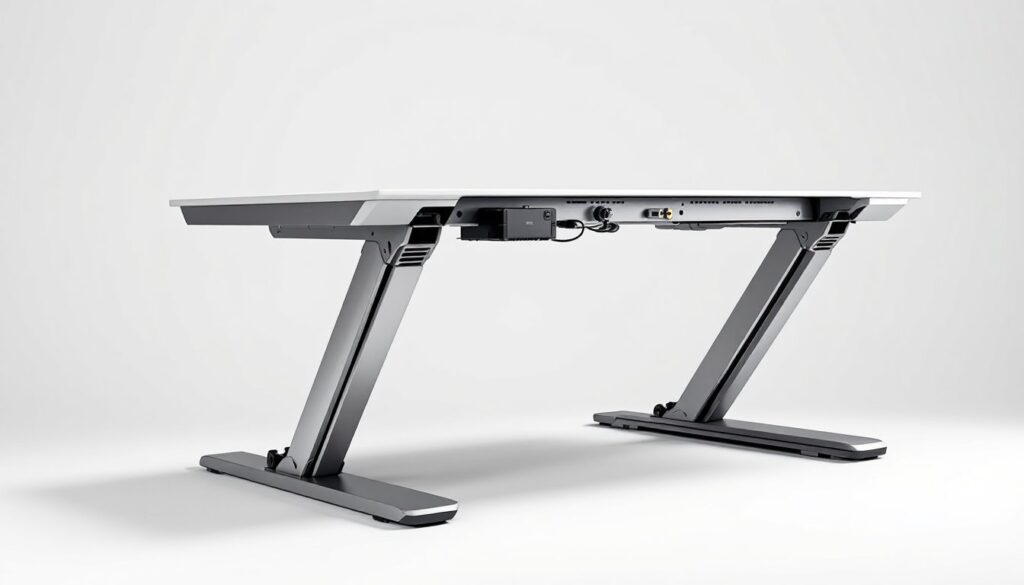
Electric standing desk frames are the gold standard for daily use. They use dual motors (one per leg) or a single motor with a drive shaft to raise and lower the desktop at the push of a button. Most models include programmable height presets, typically three or four memory positions, so you can switch between sitting and standing without re-measuring.
Motor quality varies. Budget frames use basic DC motors that move slowly (around 1 inch per second) and struggle with heavier loads. Mid-range and premium frames feature brushless motors that adjust faster, run quieter, and handle 250+ pounds without strain. If you’re planning to use a solid-wood desktop or multiple monitors, spend the extra $100–$150 for better motors.
Duty cycle is another consideration. Most residential electric frames are rated for intermittent use, 20 to 30 adjustments per day. If multiple people share the desk or you adjust frequently, look for a commercial-duty frame designed for continuous operation.
Electric frames require a power outlet, so plan cable routing accordingly. Some models include cable management trays: others leave you to figure it out. Budget an extra $20–$30 for adhesive cable clips or a simple under-desk tray.
Manual Crank and Pneumatic Legs
Manual crank legs use a hand-crank mechanism to adjust height. They’re significantly cheaper than electric frames, often $150 to $250 versus $300 to $600, and require no power source. The trade-off is convenience: cranking a desk up and down takes 20–30 seconds of effort, which discourages frequent adjustments. Many users set the height once and leave it.
Crank systems work best for light-duty applications or secondary workstations. They handle lower weight capacities (typically 100–180 pounds) and wear out faster under heavy loads. The gearing mechanism can strip if you force it or overload the frame.
Pneumatic legs use gas springs (similar to office chair height adjustment) for quick manual changes. Press a lever, lift or lower the desktop, release the lever. They’re faster than cranks but limited to lighter loads, usually under 50 pounds including the desktop, which makes them impractical for most full-size desks. Pneumatic systems work better for laptop stands or small workstations.
For DIY enthusiasts interested in woodworking project plans or building a custom standing desk from scratch, manual systems offer simplicity and lower upfront cost. But if you’ll actually use the sit-stand function daily, electric frames are worth the investment.
How to Choose the Right Standing Desk Legs for Your Space
Start with desktop dimensions. Measure the width and depth of your planned work surface. Most standing desk frames adjust between 42 and 72 inches wide: some extend to 80+ inches for large desktops. The frame should sit at least 4 inches inboard from each edge for stability and to avoid visible hardware.
If you’re building a custom top, account for nominal versus actual lumber dimensions. A 2×6 plank measures 1.5 × 5.5 inches, not 2 × 6. Edge-glued panels often run slightly undersized. Measure your finished desktop before ordering a frame.
Weight capacity needs a realistic assessment. Weigh your desktop (or estimate: 3/4-inch plywood runs about 2.2 pounds per square foot: butcher block is closer to 4 pounds per square foot). Add monitors, computer, and accessories. Choose a frame rated for at least 25% over that total. If you’re close to the limit, upgrade to a higher-capacity model or consider a lighter desktop material.
Height range matters for ergonomics. Measure your elbow height while standing, that’s roughly where your keyboard should sit. Most frames offer 24 to 50 inches of travel, which covers users from 5’0″ to 6’4″. If you’re outside that range, look for specialty frames with extended or shortened legs.
Consider footprint and floor clearance. Electric standing desk frames have a rectangular foot at each leg base, typically 18–24 inches long. Make sure the feet won’t interfere with baseboards, heating vents, or floor cable runs. Frames with smaller feet are less stable but fit tighter spaces.
Noise level becomes an issue in shared spaces or home offices near bedrooms. Budget electric frames generate 50–60 decibels during adjustment, about as loud as a normal conversation. Premium models with brushless motors run closer to 45 decibels. If noise matters, check manufacturer specs or user reviews.
Finally, think about future-proofing. A quality standing desk frame outlasts multiple desktop changes. Choose a frame that’ll accommodate a larger surface if you move or expand your setup later. Adjustable-width frames offer the most flexibility.
DIY Installation: Step-by-Step Guide to Assembling Your Standing Desk
Tools and materials you’ll need:
- Power drill with Phillips bits
- Tape measure
- Carpenter’s square
- Pencil
- Safety glasses
- Wood screws (usually included with frame)
- Optional: stud finder (if wall-mounting cable management)
Most standing desk legs ship with all necessary hardware. Unpack everything and confirm you have the instruction manual, mounting brackets, screws, cable clips, and control panel.
Step 1: Prep the desktop. Lay the desktop upside down on a clean, padded surface (old blankets work well) to avoid scratches. If you’re using raw lumber or a DIY leaning standing desk design, make sure the surface is sanded, sealed, and fully cured before attaching hardware.
Step 2: Mark mounting positions. Measure and mark where the legs will attach. Most frames include a paper template: tape it to the underside of the desktop and mark screw holes with a pencil. If there’s no template, measure from each edge to center the frame. Use a carpenter’s square to ensure the marks are perpendicular to the desktop edges.
Step 3: Attach the mounting brackets. Secure the frame’s mounting plates or brackets to the desktop using the provided wood screws. Pre-drill pilot holes if you’re working with hardwood, this prevents splitting and makes driving screws easier. Screws should penetrate at least 3/4 inch into the desktop but not break through the top surface. For a 1-inch-thick desktop, use 3/4-inch screws.
Step 4: Assemble the frame. Follow the manufacturer’s instructions to connect legs to the crossbar or control box. Most electric frames use a simple bracket-and-bolt system. Tighten all bolts hand-tight first, then use a wrench for final tightening. Don’t over-torque, you can strip threads or crack plastic housings.
Step 5: Attach the frame to the desktop. With the brackets already mounted, align the frame and secure it using the remaining screws. Double-check that the frame is centered and square before fully tightening.
Step 6: Install the control panel. Most desks include a wired keypad that mounts to the desktop edge or underside. Route the cable neatly and secure it with the included clips. If you’re installing near electronics, keep motor cables separate from data cables to avoid interference.
Step 7: Flip and test. Get a second person to help flip the desk upright, even unloaded, a standing desk frame can weigh 50–70 pounds. Plug in the power supply and test the full range of motion before adding monitors and equipment. Listen for unusual noises and check that both legs move in sync.
Safety note: Wear safety glasses when drilling overhead. Keep fingers clear of moving parts during testing. If the desk wobbles or makes grinding sounds, stop immediately and check for loose bolts or misaligned legs.
Maintenance Tips to Extend the Life of Your Standing Desk Legs
Standing desk frames are low-maintenance, but a few simple habits prevent premature wear and keep adjustments smooth.
Monthly:
- Inspect bolts and screws. Vibration from daily adjustments can loosen hardware over time. Check mounting screws and frame bolts every month. Tighten any that have backed out.
- Clean the columns. Dust and debris accumulate inside the telescoping leg columns, especially in workshops or basements. Wipe down exposed column surfaces with a dry microfiber cloth. Avoid spraying cleaners directly into the mechanism.
- Check cable routing. Make sure power and control cables aren’t pinched or rubbing against moving parts. Frayed cables are a fire hazard.
Every 6 months:
- Lubricate moving parts. Apply a small amount of silicone-based lubricant to the telescoping columns and any pivot points. Avoid oil-based lubricants, they attract dust and gum up over time. Wipe off excess with a clean rag.
- Test weight distribution. If the desk tilts or one leg lags during adjustment, the load may be uneven. Redistribute heavy equipment or adjust the desktop position.
Annually:
- Inspect the power supply. Check for loose connections, frayed wires, or heat damage around the plug. Replace damaged cables immediately.
- Test the full range of motion. Raise the desk to maximum height and lower it fully. Listen for new noises or hesitation. Grinding or clicking sounds indicate worn gears or motor issues, address them before they fail completely.
Common issues and fixes:
- Desk wobbles side-to-side: Tighten all frame bolts. If wobble persists, the floor may be uneven. Use adhesive furniture pads or adjustable feet (available as aftermarket upgrades) to level the frame.
- One leg moves slower than the other: This usually indicates an overloaded frame or debris in the column. Reduce desktop weight and clean the mechanism. If the problem continues, contact the manufacturer, motors may need replacement.
- Control panel stops responding: Check power connections and try resetting the control box (most models have a reset procedure in the manual). If the panel still doesn’t respond, the control board may be faulty.
For hands-on DIY tutorials and troubleshooting more complex mechanical issues, manufacturer support forums and video guides can be invaluable.
A well-maintained standing desk frame easily lasts 10+ years. Treat it like any other piece of shop equipment: keep it clean, lubricated, and properly loaded, and it’ll outlast multiple desktop upgrades.